Diagram Layout Is Lost Diagram Is Generated Again
Create stunning, loftier-quality diagrams with the Visio Data Visualizer add-in for Excel with a Microsoft 365 work or school business relationship.
You tin create bones flowcharts, cross-functional flowcharts, and organizational charts. The diagrams are drawn automatically from information in an Excel workbook. If you so edit the diagram in Visio, your changes are synced back to Excel.
This ways you don't need a Visio subscription to make stunning diagrams in Excel. View, print, or share your diagrams with others for free in the spider web version of Visio. For boosted editing capabilities, yous demand either a Visio Plan 1 or Visio Plan 2 subscription.
Note:The Visio Data Visualizer add-in is supported in all the languages supported by Visio for the web. A complete list of the languages is shown at the end of this article.
Start with the Visio Information Visualizer add-in
The Data Visualizer add-in is available for Excel on PC, Mac, and the browser with a Microsoft 365 work or school account.
(If the only Microsoft business relationship you have is a personal one—that is, hotmail.com, live.com, outlook.com, or msn.com—you can still attempt out parts of the Data Visualizer add-in without signing in. It just means that the features available to yous are somewhat limited. Read The Information Visualizer add together-in is designed for Microsoft 365 work and school accounts for more details.)
-
Open Excel and create a new Blank workbook.
-
Salvage the workbook to a OneDrive or SharePoint location for seamless sharing and the optimal experience. You tin as well save your file locally to your figurer.
-
Ensure that an empty prison cell is selected in the workbook.
-
Select Insert > Get Add together-ins or Add-ins. In the Office Add together-ins Store, search for "Data Visualizer", and and so select Add together. If you see a security bulletin regarding the add-in, select Trust this add-in.
-
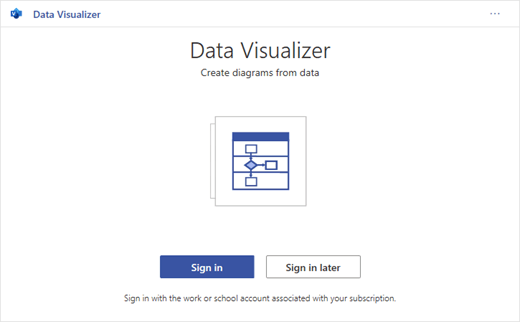
Sign in with the account associated with your Microsoft 365 work or schoolhouse subscription, or select Sign in later.
In the add together-in, nosotros no longer support manual sign-in ("ADAL"). But we automatically notice your identity and sign you in. If we tin can't sign you in, it means your version of Excel doesn't work with the add-in. Y'all tin can fix this by using Excel for the web or upgrading to Excel for Microsoft 365.
Notation:When you're signed in, yous unlock capabilities in Visio for the web such equally press, sharing, and viewing in the browser. You don't need a Visio subscription to use this add-in, but if yous have one, you'll too be able to make edits to your diagram.
If you see a permissions prompt, select Let.
As an alternative to the process to a higher place, you lot can download our add-in prepare templates to become started in Excel:
Modify the data-linked table to customize your diagram
-
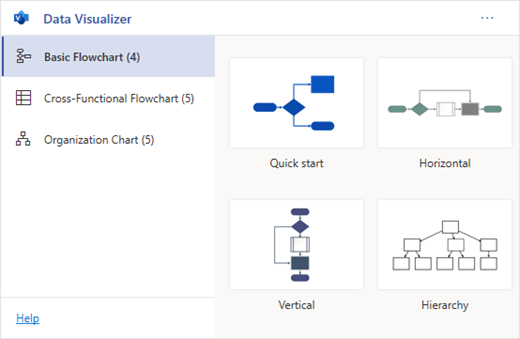
Cull a diagram type and and so select the template you lot'd like to work with. This will insert a sample diagram and its data-linked table. That process may accept a minute. The templates come up with different layout and theme options that tin be further customized in Visio.
-
If you're signed in, the diagram is saved as a Visio file in your OneDrive or SharePoint location. If you lot're not signed in, then the diagram is part of your Excel workbook instead. You lot can always choose to create a Visio file past signing in.
-
To create your own diagram, modify the values in the data table. For instance, you can modify the shape text that will appear, the shape types, and more past changing the values in the information table.
For more information, run across the section How the data tabular array interacts with the Data Visualizer diagram beneath and select the tab for your type of diagram.
-
Add or remove shapes for steps or people by adding or removing rows in the information tabular array.
-
Connect shapes to pattern the logic of your diagram past entering the IDs of the connected shapes in the respective table column for your diagram type.
-
After you've finished modifying the data table, select Refresh in the diagram surface area to update your visualization.
Note:If at that place is an result with the source information table, the Data Checker volition announced with instructions on how to prepare the issue. Afterward you alter the table, select Retry in the Data Checker to ostend the issue is resolved. And then you'll run across the updated diagram.
Tips for modifying the data tabular array
-
Save the Excel workbook (if you're working in the Visio customer) and Refresh frequently.
-
Consider sketching out the logic of your diagram on paper first. This may get in easier to translate into the data table.
View, print, or share your Visio diagram
You can open the Information Visualizer flowchart in Visio for the web to view, impress, or share your diagram with others. Learn how:
-
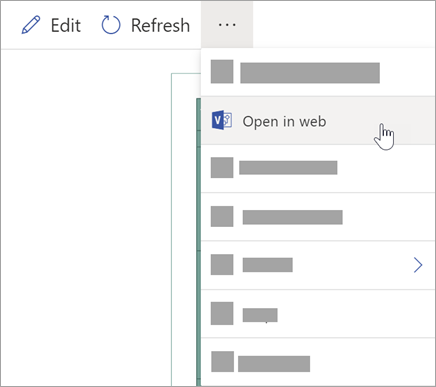
To view the diagram exterior of Visio for the web, select the ellipses (. . .) in the diagram area and select Open in web.
Note:If you're not signed in yet, you'll be prompted to sign in with your Microsoft 365 work or schoolhouse business relationship.* Select Sign in and then Let or Take on whatever permission prompts.
-
After the Visio file is created, select Open file.
-
In Visio for the web, select the ellipses (. . .) > Print to impress your diagram.
-
To share your diagram, select the Share push button to create a link or to enter the email addresses of those yous want to share with.
Edit the diagram with a Visio subscription
If yous take a subscription to Visio, you lot can practise more with the diagram. Add together text or images, apply design themes, and make other modifications to customize the diagram.
Do basic editing with Visio for the web
Apply Visio for the spider web for bones editing in the browser, such as irresolute themes, modifying layouts, formatting shapes, adding text boxes, etc.
-
In the diagram area in Excel, select Edit
 .
.Note:If y'all're not signed in yet, you'll be prompted to sign in with your Microsoft 365 or Microsoft 365 work or school account. Select Sign in and then Allow or Accept on any permission prompts.
-
Make your changes to the diagram in Visio for the spider web.
To do this
Utilise
Add and format text
Home > Font options:

For more details, run into Add and format text.
Change the theme
Design > Themes

Design > Theme Colors

For more details, see Utilize a theme or theme colour.
Alter the diagram'due south layout
Design > Layout
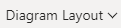
For more details, come across Re-layout a diagram.
If you want to add or modify a shape while still keeping the source data in sync, then edit the diagram with the Visio desktop app. Such changes made in Visio for the spider web can't by synced back to the Excel source file.
-
When you're done editing the diagram, become back to the Excel file and select Refresh
 to run into your changes.
Practise avant-garde editing with the Visio app
Use the Visio desktop app for avant-garde edits, such as adding new shapes, modifying connections, and other changes to the structure of the diagram. The Visio app supports two-manner sync, and so any changes you brand can be synced back to your Excel workbook where you tin come across your diagram changes after refreshing.
Annotation:To edit in the Visio app, you demand a Visio Program 2 subscription.
-
In the diagram area in Excel, select Edit.
-
Save and shut your Excel file.
To edit in the Visio app and successfully sync changes, the Excel file with the data table and diagram must be airtight.
-
In Visio for the web select Edit in Desktop App in the ribbon.
-
Select Open to confirm. If you receive a security warning request if this Visio file is a trusted document, select Yes.
-
Make your changes to the diagram in the Visio app.
-
When y'all're done, select the diagram container to encounter the Data Tools Design tab in the ribbon, and and then select Update Source Data.

Note:If yous effort to update the source data and the link to the Visio data is cleaved, Visio prompts you to relink. Select the diagram area in Visio, and nether the Data Tools Blueprint tab select Relink Source Data. Browse to the Visio workbook with the source table, select Relink, so Update Source Information again.
-
Now that your information has synced dorsum to your Excel workbook, salvage your Visio file—preferably in the same location as your Excel file.) Close the Visio file.
-
Open up the Excel file and select Refresh in the diagram expanse to see your changes.
Note:If you meet a Refresh Disharmonize, you can refresh the diagram. You'll lose whatsoever edits you lot've made, but any formatting changes to the shapes or connectors inside the container are preserved.
Microsoft 365 subscribers who have Visio Program 2 tin can utilize Data Visualizer templates to get more advanced diagramming features, such as those listed below. See Create a Data Visualizer diagram for more details:
-
Create a diagram using custom stencils
-
Create sub-processes
-
Bring your diagram to life with information graphics
-
Have two-way synchronization betwixt the data and the diagram
How the data table interacts with the Data Visualizer diagram
Each cavalcade of the table uniquely identifies an of import aspect of the flowchart that you see. Encounter the reference information beneath to learn more nigh each cavalcade and how it applies and affects the flowchart.
A number or name that identifies each shape in the diagram. This column is required, and each value in the Excel table must be unique and not exist bare. This value does not appear on the flowchart.

This is the shape text that is visible in the diagram. Depict what occurs in this step of the procedure. Consider also calculation a similar or more descriptive text to the Alt text column.

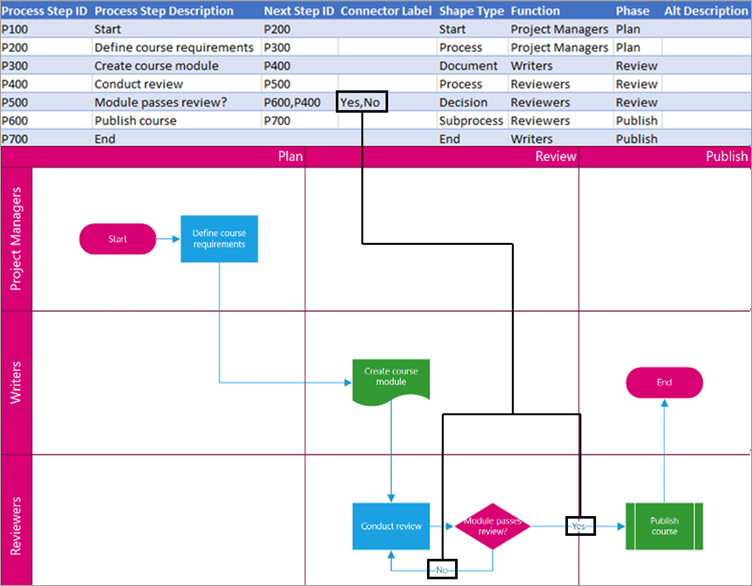
The Process Step ID of the next shape in the sequence. A branching shape has two side by side steps and is represented past comma-separated numbers such as P600,P400. You can take more than ii next steps.
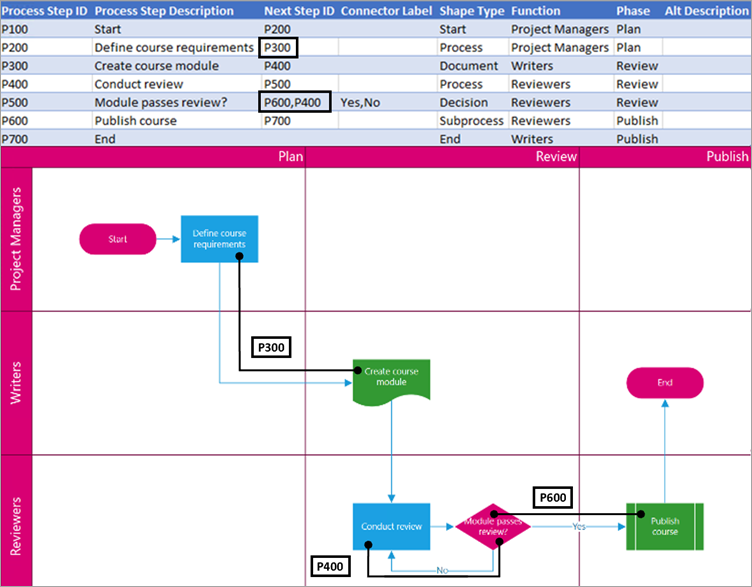
For branching shapes, connector labels are represented as text separated past a comma, such as Yes,No. Yes corresponds to P600 and No corresponds to P400 in the example. Connector labels are non required.
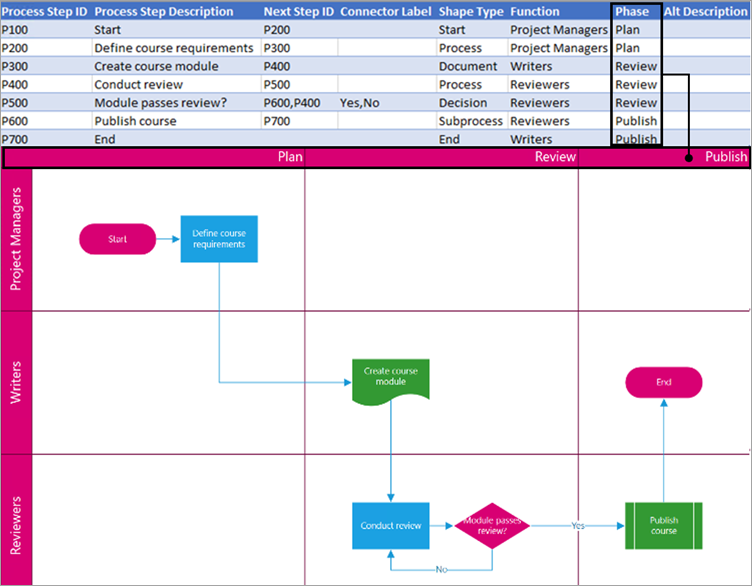
The function (or swimlane) that each shape belongs to. Apply the Function and Phase columns to help you organize different stakeholders in your flowchart. This cavalcade only applies to a Cantankerous-Functional Flowchart and isn't included as office of the Bones Flowchart diagram.

The phase (or timeline) that each shape belongs to. Use the Function and Phase columns to help you organize different stakeholders in your flowchart. This column only applies to a Cantankerous-Functional Flowchart and isn't included as part of the Basic Flowchart diagram.
Alt text is used past screen readers to assist those with visual impairments. You lot can view alt text you've entered as office of the Shape Info of a shape. Entering descriptive alt text is non required, only recommended.
Each column of the tabular array uniquely identifies an of import attribute of the organization nautical chart that yous meet. See the reference information below to acquire more than almost each column and how it applies and affects the diagram.
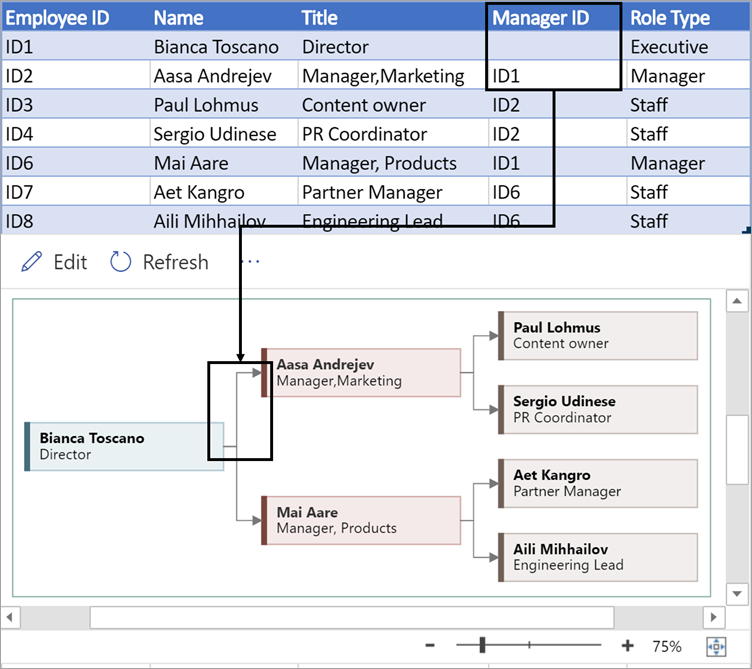
A number that identifies each employee in your organisation chart. This cavalcade is required, and each value in the Excel tabular array must be unique and not blank. This value doesn't appear in the diagram.

Enter the full name of the employee you want to acquaintance with the employee ID number. This text displays in the diagram equally shape text.
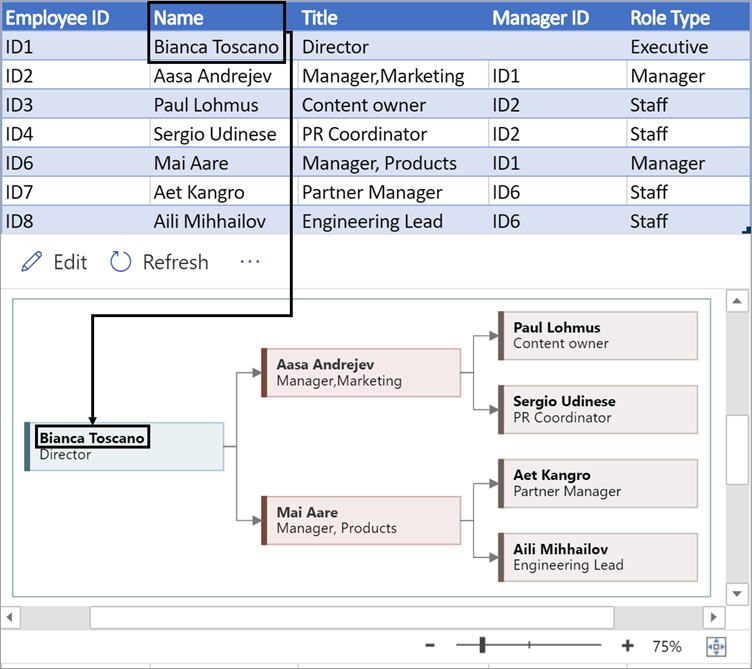
Provide additional details for the employee by entering the job title or role. This text displays in the diagram shapes underneath the employee's name.
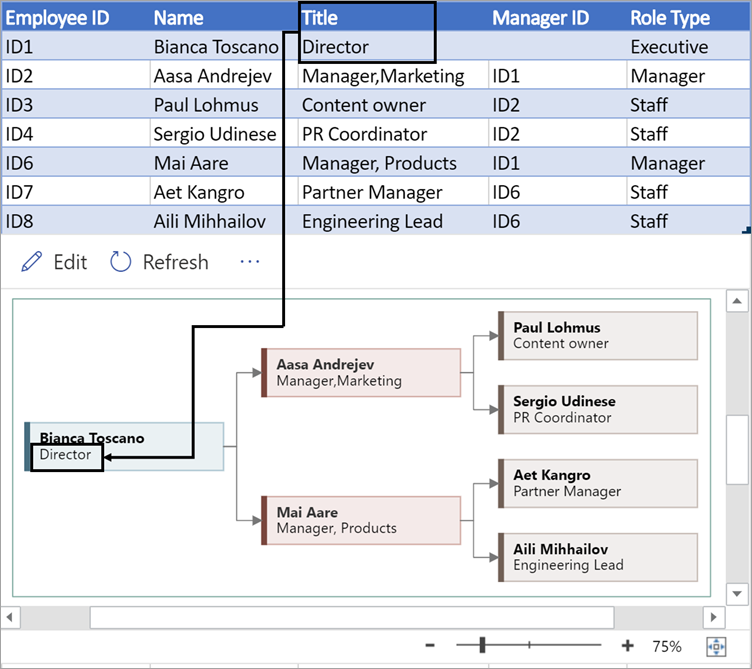
To create the structure of the organization chart, use this column to identify the director of each employee. You can get out it blank for those who don't report to anyone. You lot'll enter the corresponding employee ID from the showtime cavalcade. You can likewise separate multiple managers using a comma.
Organization charts in the add-in come with different function types for you to choose from. Select a field under the Role Type cavalcade to choose a function that best describes the employee. This will change the color of the shape in the diagram.

Supported languages for the Information Visualizer add together-in
Click the subheading to open the list:
-
Chinese (Simplified)
-
Chinese (Traditional)
-
Czech
-
Danish
-
Dutch
-
German language
-
Greek
-
English
-
Finnish
-
French
-
Hungarian
-
Italian
-
Japanese
-
Norwegian
-
Shine
-
Portuguese (Brazil)
-
Portuguese (Portugal)
-
Romanaian
-
Russian
-
Slovenian
-
Spanish
-
Swedish
-
Turkish
-
Ukrainian
See Also
About the Data Visualizer add-in for Excel
Source: https://support.microsoft.com/id-id/office/create-a-diagram-in-excel-with-the-visio-data-visualizer-add-in-bee3b5aa-aaaf-4401-acc6-276b711c763c
0 Response to "Diagram Layout Is Lost Diagram Is Generated Again"
Post a Comment